Showing posts with label nail art. Show all posts

Thursday, May 29, 2014

Bestie Twin Nails with @Nails_by_Charlie

Hey y'all! So @Nails_by_Charlie and I decided that we wanted to do Bestie Twin Nails together! I have been trying to find someone around the same "skill level" as I am, and willing to do some nails together for quite some time. But that was really difficult. Either everyone I came across was either way outta my league, or wasn't quite there yet. Now, don't get me wrong, I don't judge anyone on their "skill level", I just didn't want someone outta my league, because maybe they would want to do a really difficult design that I wouldn't be able to complete, and be proud of. Or...I would be the one choosing a design that someone who isn't quite up to my "skill level" yet, that may not be in their comfort zone. So trying to find someone with the same "skill level" was a challenge in itself! lmao.

 So you can imagine how excited I was when Charlie asked if I wanted to do them with her! Which, by the way, she is an amazing person! Be sure to follow her on Instagram, and check out her blog! So anywho, we exchanged a few ideas, and decided on a SUPER cute design by @Saraxbeara...and I think we did a pretty damn good job! See for yourself!


And here is our inspiration...


See! Pretty damn good, right!? lol.

I had so much fun doing these cute designs. I really hope to do more Bestie Twin Nails in the future! So if you're interested in joining me, please don't hesitate to contact me! I swear I don't bite! ;P

Tuesday, May 27, 2014

Cherries Pictorial!

Woohoo! Pictorial time y'all! As I promised for my lack of posts this holiday weekend, I will be uploading as many manis, and pictorials as I can fit in this week! Today, I posted my 2 day late #fruity mani for #NailArtMay!


Step 1: Paint a navy blue onto your nail (I used 2 coats of Loaded Lacquer's Paradise Overdose).
Step 2: Create a white tip (the white base will help the colors pop over the dark base color).
Step 3: With a small dotting tool dipped in a white polish, place 2 small dots next to each other for the cherries. With a small nail art brush, paint a small upside down "v" to connect the cherries as their stem, and leaves at the top of the stems. Also, with the small dotting tool, place little white "stars" randomly between the cherries.
Step 4: Color!!! But make sure not to color your stars!
Step 5: I added a small white glare line to my cherries to make them look a little more real. Add top coat, and you're done!

I hope this helped y'all out! Feel free to ask any questions! Don't be scared if you think you won't be able to do this...practice makes progress y'all! You gotta start somewhere! So 1, 2, Paint!

Wednesday, May 21, 2014

Floral Pictorials - Black & White

Hey y'all! So while I was painting on my cute floral yin-yang nails, I decided to snap a few pics in between so I could post a pictorial. It's been a while since I have, so I really wanted to. I hope y'all enjoy! These pictorials are practically the same, the black just has an extra step. So let's start with that one.

Now, keep in mind, there were a lot of polishes used for this mani, each rose took 3 colors on their own (excluding the leaves). So, make sure to grab 3 different shades of pink (light, medium, dark), 3 shades of blue, and 3 shades of purple. To see all the colors I used in my mani, click here.


Step 1: Paint a single black coat of polish (since there will be a lot of roses on it, you don't really need much more than a thin coat).
Step 2: With white polish, create the shapes of the roses, including the leaves (this will make the colors pop better against the black base.
Step 3: After the white polish from the previous step dries, fill in the white roses with the medium shades you have.
Step 4: Take your dark shade of polishes, and start drawing the petals, and inner lines of the roses.
Step 5: Go back through the roses, but this time with your lightest shade of polishes, and start highlighting a few lines in your roses to make them look a little more realistic.
Step 6: *Not Shown* Apply top coat when finished!

Now the white base is practically the same...you just don't have to outline the roses with white polish...that would just be pointless(; I'll still type the directions out though, just in case some of y'all would like it.


Step 1: Paint a single coat of white on your nail (Again, since there will be a lot of roses on the nail, it really doesn't have to be completely opaque).
Step 2: Take your medium shades, and start creating your roses in random places (leave a little room for those leaves as well).
Step 3: Take your dark shade, and start lining the inside of your roses.
Step 4: Take your lightest shades of polish, and start to highlight some lines in your rose.
Step 5: Apply top coat, and you're finished!

Keep in mind y'all that your roses don't have to be perfectly circular, and anything! Mine definitely aren't, and neither are the real ones in nature! Practice makes progress, so don't give up! I hope these have helped y'all! Paint on lovies!

Monday, May 19, 2014

1, 2, Freddy's Coming For You...

So, as y'all know, a few weeks ago I created some Freddy Krueger/A Nightmare On Elm Street nail art for a friend who had requested them. She figured, if I could do it on my nails, I could do it to hers. So I did, I went on to paint my nails, and try to perfect this Freddy mani for her, and this is what I came up with...


Which, I fell in love with! I definitely could've done wayyy better on my Elm St. sign, but I had been working on them for so long, that I just gave up. haha. I knew I could do better on it if I was going to paint them again. Which I did for Brittney last Thursday, and this is how they turned out...


So cute! Her signs were definitely better than my original, and I was proud! She wanted these nails really badly, because not only is she a big fan of Robert Englund (Freddy Krueger), she was going to Comic Con in Dallas that upcoming Sunday to actually MEET Robert Englund IN PERSON! She wanted to show him her nails! HOW COOL, RIGHT!? haha. I honestly didn't think too too much about it, though. I figured she wouldn't be the only one with some cool themed nails, right? (Oh, and I also made her a small nail polish ring with Freddy's sweater stripes on it, which you will see pictured when you keep scrolling through.)

Well, she went to Comic Con, and a few hours later I see that I got tagged by her on FB. I figured it was some pics, or something, so I go, and look, and find this...

I'm assuming she meant *show* lol

I was all like, "WWWHHHAAATTT!?!?!?!?!?" I won't lie...I freaked out quite a bit! It was unbelievable! Robert Englund liked my nail art so much, he wanted a fan to return to show his wife!? If that isn't big news, I don't know what is!!!!!!

EVEN BETTER...Brittney is sooo awesome, she got pictures for me!!!!!!!!


Yes, I tagged the picture out the ass, but I didn't want someone else to try to steal my amazing news! lol. Paranoid much? But yea, so here Brittney is showing off her nails, and that nail polish ring I was telling you about earlier(; And how cool is it that Heather Langenkamp TOOK A PICTURE of MY nail art!? I've been scouring the internet, and social media to see if she has uploaded it. I wish so badly that I could've been there. I want to know what they would've said to me about my art. But since I couldn't be there, Brittney was awesome enough to document this huge accomplishment for me! I am so thankful!!!!!!

All in All

Paint on! Seriously! Do NOT get discouraged if you think you're "not good enough". I've had PLENTY of nail fails the past year I've been doing my nails, and it's only proved to make me a better artist. I've got an entire page dedicated to My Nail Fails to try to help motivate y'all, and to show you that you CAN get better! You just gotta practice loves! Practice makes progress!!!

Monday, April 7, 2014

Game of Thrones - Drogo

As some of y'all may know, I am a total Game of Thrones "nerd". Lol. I think that it's one of the best shows ever. Well, my favorite character of the series is, of course, Khaleesi, Daenerys Stormborn Targaryen, The Mother of Dragons! She is just a freakin badass! And...she has dragons! Talk about an upper hand. Lol.

So in light of the season 4 premiere I decided to do some GoT inspired nail art. I chose Drogon (Khaleesi's biggest, and most aggressive dragon) as my inspiration. Since I really loved Khal Drogo, and that's who Drogon is named after, I saw it...fitting. 

Unfortunately, since I am in the middle of packing up my and Corbey's things for our move into our new house this week, I do not have a tutorial for this mani. I hope y'all understand! I wasn't even supposed to have time for this mani to even be possible! But I decided to take a (much needed) break and indulge myself in my passion for painting my nails. I hope y'all enjoy it, and don't forget to paint on!

***Colors used for this mani listed here***


Friday, April 4, 2014

No More Mani Monday/Tutorial Tuesdays!

Ok y'all! So I've decided to take Mani Monday, and Tutorial Tuesdays away! But don't worry! I'm just gonna start posting my manis, and pictorials as I go along! So instead of just 1 mani/pictorial a week, it could be 2, or 3, or even 4! Exciting right!? With that said, let's get into todays mani!

***Colors used listed here.***

Lace with Sheer Polka Dots


This gorgeous lace, and sheer polka dot design was inspired by @BadGirlNails (instagram)! This design has been all the rage! I've seen so many recreations of this lately, so I just had to jump on the band wagon, and try it out for myself! And I am one happy camper! Even though it did take me a nice amount of time to finish, I am very happy with the results! And I hope y'all are too! I would've done a pictorial for the lace nails, but honestly, I kept messing up, and so I stuck with the easy one! lol.

Sheer Polka Dot Pictorial


Step 1: Start off with a base coat to protect your nails from staining (I use OPI Nail Envy before EVERY mani).
Step 2: Create your own sheer black polish (details below!).
Step 3: I painted 2 coats of the black sheer polish I created.
Step 4: Polka dot it up!!!
Step 5: Outline your nail with a small nail art brush, and bam! You're done!

Black Sheer Polish DIY


I had to create my own black sheer polish, since I didn't have my own, and I used the video tutorial that @NailStorming (instagram) had posted! I just so happen to have my own pictorial from when I made my own!


Step 1: Grab a clear base coat (I used Seche Clear...after I cleaned the label on the bottle).
Step 2-3: Start adding a few drops at a time, and testing the darkness on your nails as you go (I started with 5 drops, and it was too light. I ended up using 10-12 drops for half of my Seche Clear).
Step 4: Shake shake shake, and you're done!

I really hope that this has helped y'all out! Comments, and feedback are always appreciated! Oh, and don't forget to paint on! ;)

Wednesday, April 2, 2014

Mani Monday & Tutorial Tuesday on Wednesday!?

Hey y'all! So I was lucky enough to be able to create my new mani this week, AND get pictures for my pictorial! So....this "turquoise stone" design was my first time to ever use water in one of my manis! It was kinda hard! lol. But I'm pretty ok with the outcome. I know how it all works now, so I will be able to do better next time. Step by step directions below!

@sprinklenails inspired

Step 1: Paint your nail a turquoise-y color.
Step 2: Tape around your nail for easy clean up!
Step 3: Put 1-2 drops of black polish in warm-hot water, and watch it spread out (if it doesn't spread, adjust the temperature of the water).
Step 4: Spray the water with a perfume bottle to get that spotted look.
Step 5: Slowly lower your nail into a spot that you think will look nice.
(Repeat steps 3-5 but with a gold polish if you want the gold accents)

Pretty simple right!? For all the colors I used in this mani, click here. I hope y'all enjoyed this pictorial! Paint on!

Monday, March 31, 2014

Mani Monday - March Monthly Favorites

Hey y'all! So today, I am spring cleaning! I am fed up with the mess that is my room! So today for Mani Monday, I am posting my Monthly Mani Favorites for March! Yay! I'm sorry for those of you who like to see a new design every Monday, but I just don't have the time today! :( But I hope, y'all still enjoy today's post! I did quite a few wonderful designs that I fell in love with, but I narrowed it down to 5, even though I don't think I had much more than 5 this month(;

All manis, and colors used are listed here.

***If y'all came from my Instagram, and are interested in being my Nail Art Bestie, then keep reading!***

My Birthday Mani/Neon Tribal/Outfit Inspired/Dandelions/St. Patrick's Day

Nail Art Bestie

Ok ladies! I am searching for my Nail Art Bestie! Is it you!? I see the awesome friendships on Instagram with all you lovely nail artists, and I would like to have my own NAB! Wouldn't you!? I would like to find someone who's skill level is somewhat around mine (whether it's better, or 'not quite there yet'), just someone who would like to challenge themselves to try out some new designs so we can do Bestie Twin Nails, or for us to do a Mani Swap together. I would be posting our nail creations together on my Instagram, Facebook, Pinterest, Twitter, Tumblr, and here on my blog! Fun, right!?

Well, other than the skill level in my future Nail Art Bestie, I would also like to actually befriend you on every other friend-level, and not just nail art. I would like to have a nail crazy friend that I can talk nails 24/7, send nail mail to, and her return the favor. I wanna know your birthday, or anything special going on in your life, if you need advice, I'll be here for you for whatever, and hopefully vice versa. I am all for making new friends, always! So, if you would like to be considered for my Nail Art Bestie, please KIK me (w0nderlandbby) with the following info (I will fill my info in as a reference):

Name: Cassie
Age: 23
Location (State): Texas
Instagram Username: @w0nderlandbby
Favorite Indie Brand: Loaded Lacquer.
Why You Want To Be My Nail Art Bestie: I want you to be my NAB, because...
A Little About Yourself (Non Nail Related): I love cats! I have 2, and am considered a Crazy Cat Lady to my friends. I love going to concerts when I can afford it. I love tv shows, and movies. I have an awesome boyfriend! I live in a small hick town. lol.

So that's all you have to send, and I will get back to every single person who KIK's me! Thanks y'all! Oh, and don't forget to paint on! :P

Thursday, March 27, 2014

Neon Tribal!

This mani took me two days to complete! I was tagged in a picture on Facebook by a friend of mine to recreate this mani, n so I did! What do y'all think? Also, all colors used are listed here.


This is a little different from the picture I was looking at, but it's pretty damn close(; I searched the tag from the original photo on Instagram, but the account I found had no posts. So, I'm not sure if this person is the original creator of this design. If y'all know who it is, or if it is the person tagged in the original photo, please let me know. I hate not giving proper credit! 


Monday, March 17, 2014

Mani Monday - St. Patrick's Day!

Happy Monday y'all! But more importantly, Happy St. Patrick's Day! I don't know about y'all, but I don't particularly have any green articles of clothing, so I had to use a different route so I wouldn't get pinched today! Because believe me...you do NOT want to see what I am like if I get pinched! hahah.

So for today, I did this really adorable mani which included a waterfall of colors from the rainbow, lucky four leaf clovers, and of course...GOLD!

All the colors I used are listed here


Don't forget to check back tomorrow for a pictorial of the clovers! Paint on!

Tuesday, March 11, 2014

Tutorial Tuesday - Emmalynn

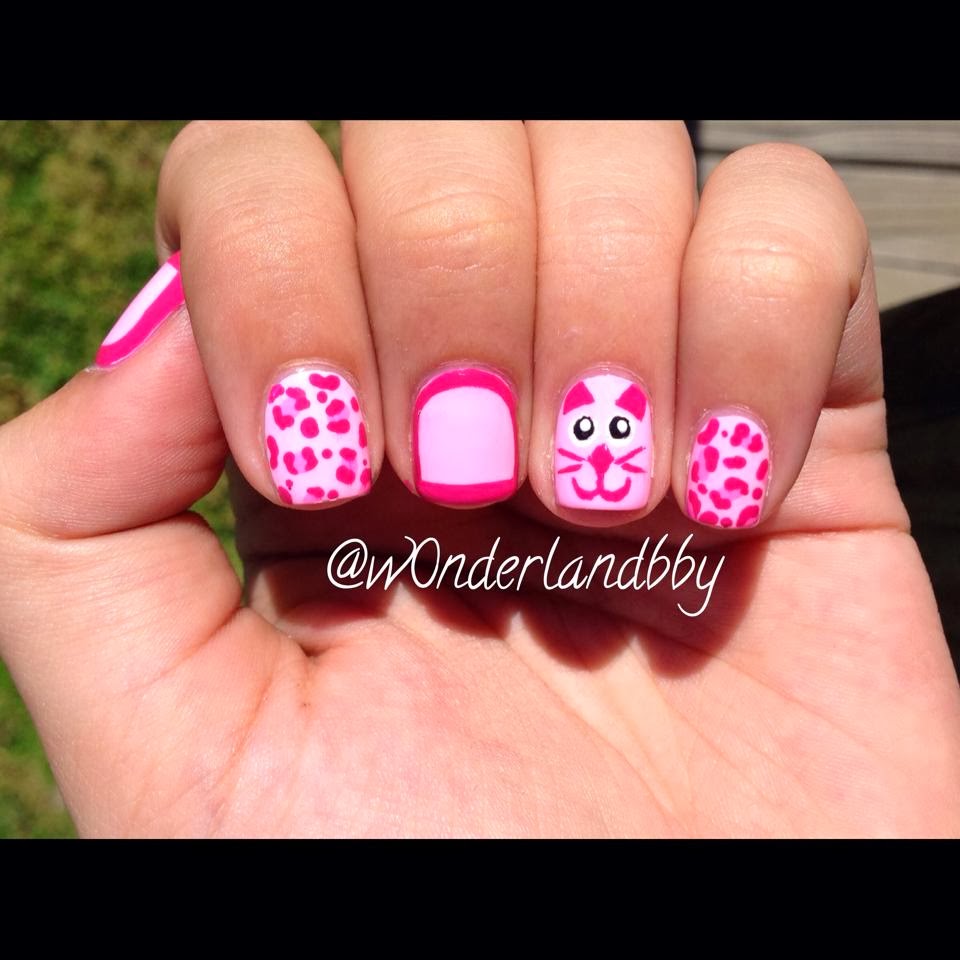
So, I'm not sure how I managed to actually remember to take pictures for my pictorial, but I will tell you that I had totally forgot to when I had started! So I had to clean my nail off, and start over! How frustrating! I gotta get into the groove of doing pictorials on the norm! I think it's really fun to show y'all how I go about creating some of my designs(: I hope y'all enjoy this tutorial of my sad little kitty! lmao.


1. Paint two (2) coats of a pastel pink base color.
2. Start with a wide, curvy "w" for the mouth, and add a diamond for a nose (I started with the mouth, and nose so that I could center the eyes better).
3. Add the cute little whiskers.
4. Add white dots for the eyes on either side of the diamond, and draw little triangles for the ears.
5. Add a black dot inside each eye, and another tiny white dot inside that black dot, and voilĂ !

Pretty simple, right!? I hope y'all enjoyed, and I'd love to see any recreations out there! Paint on!

Monday, March 10, 2014

Mani Monday - Emmalynn

Happy Monday y'all!
Today's mani was inspired by one of my friend's adorable children, Emmalynn Faith! As soon as I saw her post this picture of sweet little Emma on our random Texas ice day, I knew I wanted to recreate her outfit on my nails! It was just so pink, and cute, and what girl doesn't love pink!? I know I do! I know my kitty nail is not purrfect, but I tried! haha. Hope y'all enjoy this girly design!

Colors used for this mani are listed here.


Also, don't forget to check back tomorrow for the pictorial for this cute design for my Tutorial Tuesday post!